
Perfect Points and the Positioning Pin
Perfect Points and the Positioning Pin
by Ann Johnson
As a woman and a quilter, my favorite words, not necessarily in this order, are:
I love you!
You’ve lost weight!
Look at those points!
This Perfect Points and the Positioning Pin tutorial is written for and dedicated to quilters of all skill levels who want to improve the precision of their piecing. The focus of this tutorial is the use of a positioning pin to help maintain sharp points and straight lines within and between blocks with triangles and diagonal lines.
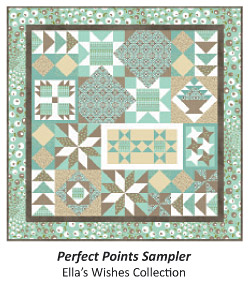
The Perfect Points Sampler pattern was designed to accompany this tutorial; it provides practice for a variety of piecing challenges involving points and diagonal lines in quilts and quilted projects. The pattern includes an introduction and five lessons, each with directions for two to three blocks, which increase in skill level. The sampler is not a first quilt! It is geared toward confident beginners and experienced quilters who want to increase the quality of their piecing.
Please don’t let the word “perfect” intimidate you! Increased precision, not perfection, is the goal. I think quilters, myself included, simply find it more fun and less frustrating to have consistently good results with few mistakes. Which of the following statements currently describes you as a quilter:
1. I am a perfectionist. I dislike quilts with triangles because my points are not perfect 100% of the time.
2. Triangles, points, diagonal lines all intimidate me. I avoid them because they often don’t turn out well.
3. Most of the time, my points are sharp and my seams (including diagonal ones) line up. I would like to improve.
4. I won’t enjoy quilting if I have to be precise; the “wonkier” the better!
5. Even with traditional designs, it really doesn’t bother me if my points are cut off or seams don’t line up.
If your answer falls somewhere between 1 through 4, this tutorial and practice pattern are for you! If your answer was 5, not so much. For those perfectionists out there, remember Brenda Papadakis’s famous line “Finished is better than perfect!” Decide what percentage of the time you would be comfortable with less than perfect results (1%, 5%?) and how often you will let yourself rip something out (my max is three). For “modern” quilters and others who prefer to ignore the “rules”, I encourage proficiency with basic skills so you know which “rules” to break and still end up with a quality finished project of which you can be proud. Hopefully for everyone, the techniques provided here will help increase the quality and enjoyment of your piecing experience.
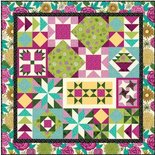
What are some examples of blocks with points and/or strong diagonal lines?
Blocks with multiple points from half-square triangles (HSTs) and Flying Geese:

Blocks with multiple diagonal lines that form points and/or intersect:
Blocks with strong visual diagonal, horizontal and vertical lines within and between blocks:
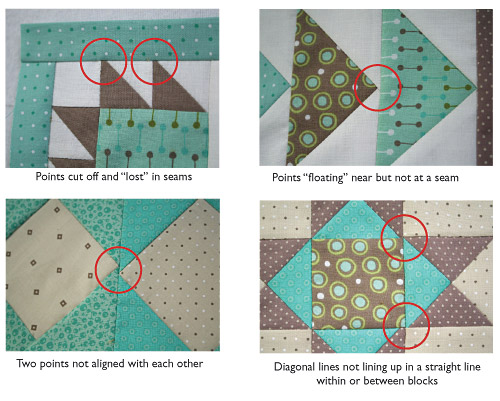
What are some piecing challenges with points and diagonal lines in quilts and quilted projects?
Most quilters have experienced points that get buried in the seam instead of being right at the seam or “float” somewhere near the seam. Two adjacent points may not meet correctly. Another common problem is discovered when two units or blocks with diagonal lines are sewn together and the extended lines are bent or don’t line up well. Using a positioning pin can minimize these errors.
What is a positioning pin?
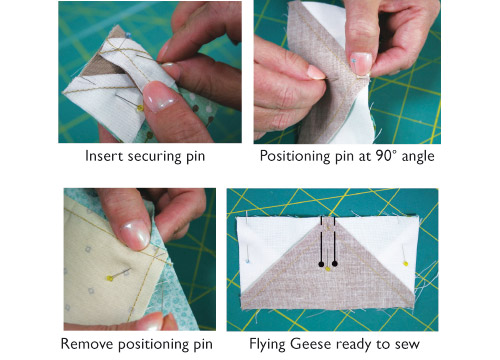
Using a “positioning pin” or the “two-pin method” refers to a precision pinning technique which helps maintain sharp points when piecing blocks with triangles. The positioning pin is also called an “alignment” pin because it is used to keep points and/or diagonal lines aligned as two units or blocks are sewn together. A straight pin is inserted and kept perpendicular (at a 90° angle) to stabilize the two parts to be joined while one or two pins come in at a steep angle, close to the fabric layers, to secure them for piecing. The positioning pin is removed before sewing. This technique is illustrated in detail below.
Note: In the Perfect Points Sampler pattern, a positioning pin is indicated by this symbol.
Arrows will point to the location on the illustrations where the positioning pin is indicated and the text will explain why.
Why is a positioning pin helpful?
Sharp points are the result of many factors: cutting, pinning, sewing, pressing and trimming. Precision piecing often relies upon subtle differences. When a pin is inserted into fabric and tilted sideways to pin two layers together, the top fabric layer shifts slightly. This can be enough to cause all those common problems illustrated before: a point is cut off or does not meet a seam, points don’t meet precisely and diagonal lines within or between blocks get out of alignment. The positioning pin stabilizes the two layers while the securing pins are inserted.
How do I use a positioning pin?
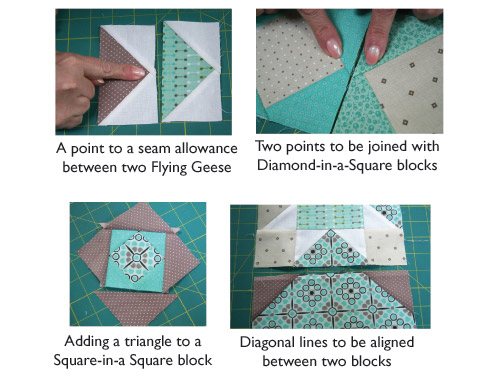
Step 1: Decide what two layers (units, blocks, border) need to be joined and where. This usually involves matching a point or seam with a seam allowance, a straight or diagonal seam or another point in the other layer. Sometimes diagonal lines need to be aligned to form a straight line between the two blocks.
Step 2: Insert a pin from the wrong side (WS) of the top layer. When there is a point, even if you think you can tell where the diagonal seams intersect on the WS, turn the fabric over to the right side (RS) to check if the pin is exactly at the point. The pin is often not precisely where it needs to be! If there is no point, put the pin in a seam or seam allowance 1/4” (or “scant 1/4”) from edge.
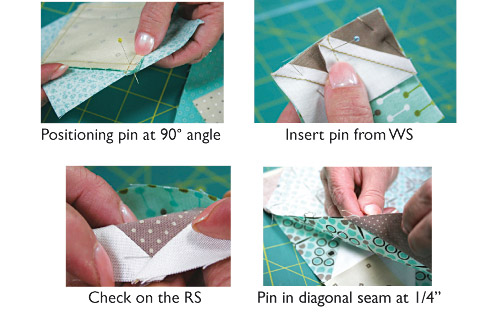
Step 3: Insert the pin into the RS of the bottom layer. If two points are to be joined, put the pin into the tip of the other point. If the point is joining a border or part of a block without a seam, put the pin in the 1/4” seam allowance. If the point is joining part of a block with a seam, put the pin in the seam 1/4” from the edge. Remember to keep the positioning pin perpendicular to the fabric! The pin head may be pushed down to the fabric if kept at a 90° angle (not shown).
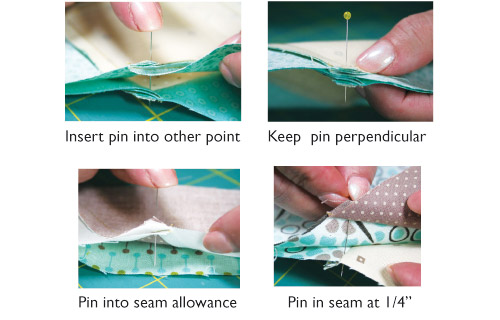
Step 4: Hold the two layers with the positioning pin perpendicular to the fabric. Come in at a low angle from the side to pin. Pinning toward the raw edge of fabric and using very fine pins both help minimize distortion. I prefer to insert the pin with the tip coming out exactly where the positioning pin is inserted. This allows me to identify the exact point even when the positioning pin is removed. Many quilters use two pins, one on each side of the positioning pin (see superimposed pins drawn on Flying Geese photo); try both ways to see which works best for you. Remove the positioning pin before sewing. Align the rest of the edges and the ends before sewing; pin if necessary.
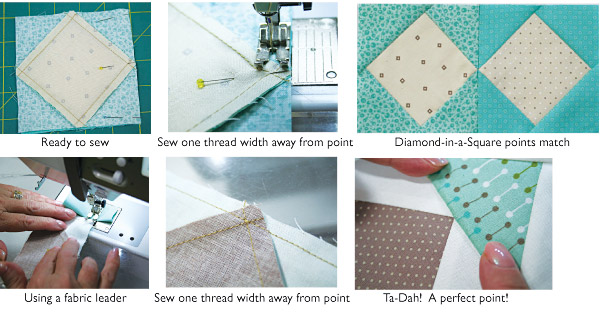
Step 5: Sew the seam. If one end of the seam has a pinned diagonal seam, start there. Using a small piece of fabric as a leader helps minimize distortion as you start sewing. I prefer to sew one stitch over to the side of a point so the seam can “roll over” or “open up” over the seam. If you sew exactly on the intersection of the diagonal lines of a point, the tip can be cut off slightly. If you are hesitant or already frustrated from “unsewing” the seam, sew a few large machine basting stitches (easier to remove) and check. For “pedal to the metal” sewers (like me), it helps to slow down when sewing with points, diagonal lines and bias. Use the tip of a stiletto, bamboo skewer or your fingernail to stabilize the last few stitches of a seam if it tends to swerve.
How can I minimize the need for a positioning pin if I don’t like to pin? Most quilters don’t use a positioning pin; some do not pin at all. Pinning is less necessary if piecing (including cutting, sewing, pressing, and squaring-up) is so precise that seam allowances, especially at points, are always exactly 1/4” (or a “scant 1/4”) and blocks are always the correct size. Because my piecing is not always perfect, but I enjoy having consistently good results the first time I sew a seam, I don’t mind the pinning. Since I do care about sharp points and aligned seams, I prefer pinning over ripping out stitches! However, pinning can distort a little even if using a positioning pin. If many points are sewn onto a border strip or a triangle onto a square-in-a square design and the seam allowances are all correct (1/4” or a scant 1/4”), it may work well, perhaps better, to not pin.

Can I use a positioning pin with paper-piecing? Hand-piecing?
Yes. Yes. I especially like to use a positioning pin when joining paper-piecing sections because the two layers of paper make it more likely that the layers will shift if a pin is inserted and tilted.
Are there other times a positioning pin is helpful?
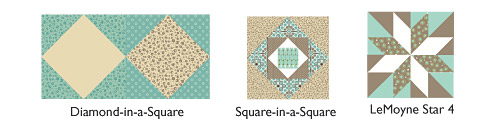
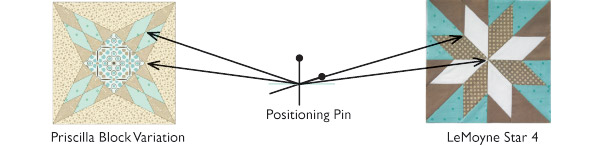
The Priscilla block variation below illustrates two instances. A positioning pin is helpful when aligning angles other than 45° and 90° angles; it could be used to match the points of the diamond shapes and set in the “Y” seams. The Lemoyne Star 4 shows two other times: the intersection of multiple horizontal, vertical and diagonal lines in the four quadrants and the center.
Precision piecing consists of careful cutting, pinning, sewing, pressing, and trimming (squaring-up). Entire books are written on this topic. Using a positioning pin will have limited benefit if the other steps are done poorly. On the other hand, it can make a big difference if you've been ca