
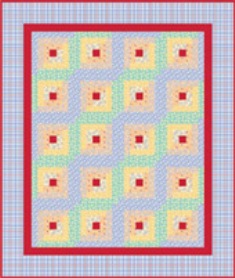
Beginner Log Cabin Block
by Karen Johnson
The Log Cabin block is an excellent block for beginners because it goes together so easily. But it's fabulous for the more experienced quilter who wants to play with color and design.
I'll show you, step by step, how to make the basic Log Cabin block from our Free pattern. If you're a beginner, or know someone who is, tune in!
If you're a beginner, here are two of our archived videos that are very valuable to watch. The first is titled How to Bind a Quilt, which might seem like an odd choice to insert here. But there are great lessons in the first 2 1/2 minutes that you should know before you start, such as how to determine the grain of your fabric and how to avoid V's in your strips when cutting from a large folded piece of fabric. Plus,once you finish this quilt, you'll need to bind it!
The next video shows you how to use a rotary cutter, ruler and mat.
Ready to sew?
Begin by cutting out all of the "logs" for your block. Using our Cutting Suggestions in the pattern, you will be cutting all of the logs from the Cross Grain (from selvage to selvage). Whenever possible, try to cut all of your logs in the same direction so they all have the same amount of ease. As you saw in the video, there is no stretch at all if you cut them on the Straight of Grain, but you'll have some ease, or stretch, if you cut on the Cross Grain.
Because you have so many fabrics and cuts, I highly recommend you place them next to your sewing machine in order by size, and label them with the letter we assigned in the pattern. This will help keep you organized throughout this block. I just used sticky notes ripped into little strips.
.jpg)
Later in this tutorial, I'm going to show you Chain Piecing, which is a super fast piecing method when you are making many blocks that are identical. But before I do that, I like to begin by piecing one full block. This helps me several ways. I know I cut everything correctly. It helps me orient myself to the order I'll be sewing. It gives me a model to work from when I begin chain piecing.
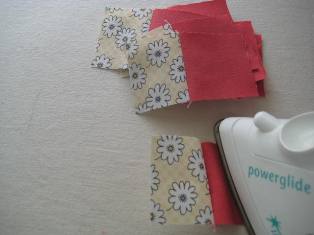
Begin with pieces A and B. Pull them away from the other strips and stitch one A and one B together, RST, using 1/4" seam allowance. I recommend using a 1/4" foot if you have one.
.jpg)
Tip! Have you ever started sewing two pieces of a block together, and your machine suddenly chugs it's way through the very first stitches? You end up with a little tangle of threads at the edge and it looks bad, kind of pulled and rough looking. To prevent this, I like to use a little piece of scrap fabric, like a starter piece. I'll refer to it as the leader. I fold 2 or 3 layers together and use the same piece over and over. Begin stitching on the leader, right up to the edge of it (edge closest to you)
.jpg)
.jpg)
.jpg)
Then just butt up your real pieces to the leader, under the foot, and continue stitching. It will look like this:
.jpg)
Snip the pieces apart and use the leader again for the next piece.
Press this unit, with the seam allowance towards piece B (yellow). And please ignore my photos, where I mistakenly pressed it to the red side because I didn't read the directions. Oops!
.jpg)
Here's an Ironing tip video:
Begin adding logs, following the pattern diagram carefully. You'll be adding them in alphabetical order, and after each seam, press the seam allowance towards the log you just added.
.jpg)
.jpg)
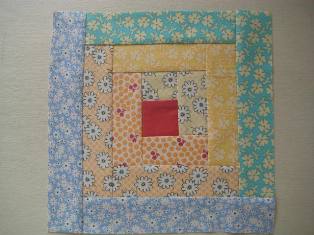
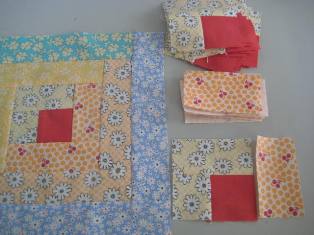
Keep adding logs until you have a finished block. Since this is now your standard and guide for the other 19 blocks, take a close look at it to be sure you placed each log in the correct position. Pretty, isn't it?!
.jpg)
Here's what your block will look like on the back (except for my first ironing mistake - no biggie in this particular case)
.jpg)
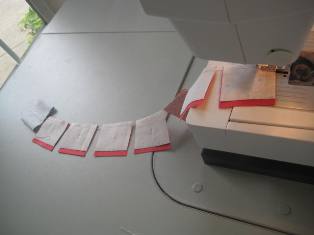
Now for chain piecing. Instead of making one entire block at a time, you will sew all 19 of the A's and B's together. Then all 19 of the C's to the unit, then all 19 of the D's. You get the idea. Here's how it looks as you chain.
Starting with your leader, sew through each unit right up to the edge closest to you. Nudge the next unit right under the foot and with just a bit of space between the two, begin sewing the next unit.
.jpg)
.jpg)
Keep going with all 19 units and you'll have a long string of these units hooked together by a few stitches. You are saving time and thread by not stopping, cutting, starting on every unit.
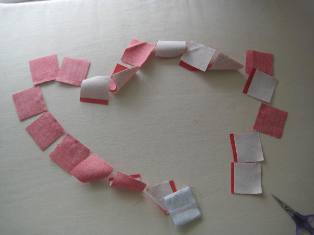
When all of your A's and B's are sewn together, clip them apart and press.
.jpg)
Using your first block as a guide, position the next log C and stitch it onto the A/B unit. Chain piece all 19 logs. See how the pile grows?
.jpg)
.jpg)
Continue in this manner, stopping to check your original block to be sure you are placing the next log in the correct position.
.jpg)
Tip! As your block grows, you'll be sewing over seams. You can choose to stitch from either side of your block, but I prefer to position my log, then flip the unit over and stitch from the back side. This way I can see the seams as I approach them to be sure they stay in the right direction when I stitch over the seam.
.jpg)
.jpg)
.jpg)
I don't want this:
.jpg)
Tip! Each time you complete a full round of logs, your block will become a square again. Be careful! When your block is square, it's very easy to place the next log in the wrong position, because it will fit on any of the four sides. It's worth the few seconds to double check your original block. Trust me, I've sewn a whole pile of logs in the wrong position and ripping we shall do!
.jpg)
Done! The wonderful thing about chain piecing is that when you've sewn the last log 19 times, all of your blocks are done. Now you can go to your design wall and lay them all out.
.jpg)


