
Binding Basics - Part 4: Attaching the Binding by Machine
Sewing the Binding onto the Front of the Quilt by Machine
by Ann Johnson
How do I start sewing the binding to the front of the quilt?
As with many things in quilting, there are different ways to add binding. Two methods will be discussed: the “tucked” and the “seamed” techniques. The names refer to how the ends of the binding are joined. Knowing how you want to join the ends determines how you start sewing on the binding. Other than the way the binding application is started and ended (when the ends are joined), the two methods are identical. With either method, it helps to use a walking foot (even feed foot) to keep the three layers of the quilt sandwich from shifting and puckering as you sew. Many quilters start adding binding on the upper right corner of the quilt about a third of the way down from the top. It is helpful to lay the binding around the quilt to see if a diagonal seam will end up at a corner; adjust the binding placement as needed. Regardless of method, it is a good idea to sew a few inches and stop to check that the seam allowance is straight, the correct size and adequate to cover the seam when the binding is folded to the back. Pinning the binding is optional. Do make sure that the raw (non-folded) edges of the binding are exactly aligned with the raw edge of the trimmed quilt or marked line (see Part Three).
"Tucked" Method
The "tucked" method involves joining the ends by tucking one end into the other. This older method is fairly easy to learn; many longtime quilters were taught this way. Cutting and folding the ends on the diagonal mimics the diagonal line of the other seams in the pieced binding. The joining of the ends will be distinguishable from the other seams in the in the binding due to the bulk of the folded layers; this fullness is the main disadvantage of this method. The following illustrations show the steps to start sewing on binding when the "tucked" method is planned.
- Open one end of the binding, trim on a 45 degree angle in the direction shown, fold down 1/4" and press.
- Refolding the binding in half will show you how the binding will look when is applied.
- Open the folded binding and start sewing just before the binding on the edge of the quilt (trimmed or marked) and continue for a few inches using the seam allowance width of you choice; 1/4" seam allowance is shown in the photographs.
- Refold the binding and start sewing again 1/2" down from edge of the top layer.
"Seamed" Method
The "seamed" method is the most common method now shown in written and online resources. The main advantage is the seam joining the binding ends is indistinguishable from other seams in the pieced binding because they are all diagonal seams with the seam allowance pressed open. The disadvantage is the technique can be harder to learn. To start sewing the binding for this method, follow these simple steps:
- Lay the raw edges of one end of the folded binding on the edge of the quilt (whether trimmed or marked) leaving a 6" to 8" loose tail.
- Leaving the binding folded, backstitch and start sewing.

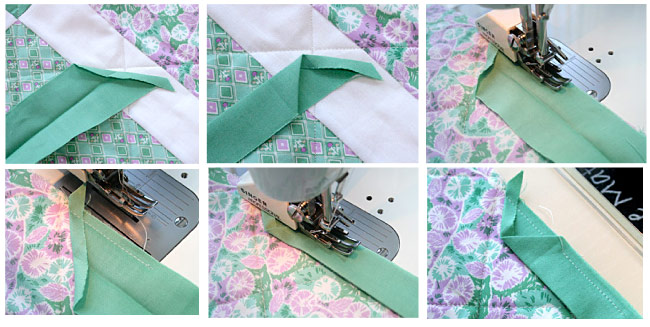
What do I do when I get to the corner?
The following instructions and photographs show you step-by-step how to turn the corners with binding for a mitered 45 degree fold:
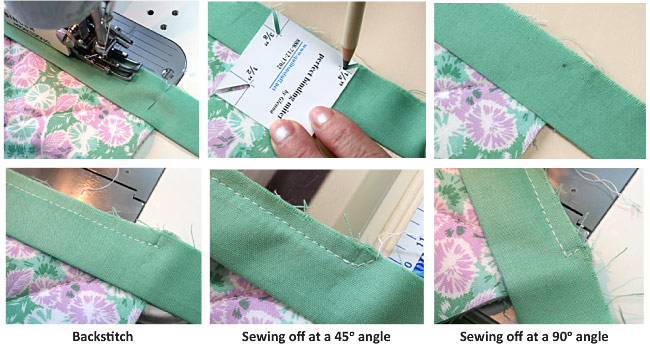
- Stop 1/4" (or whatever width of seam allowance you are using) from the corner; this can be marked with a straight pin or by using a marking tool like the Perfect Binding Miter.
- Either backstitch or sew off at a 45 or 90 degree angle.
- Lift the presser foot and needle, cut the thread, and remove the quilt slightly away from the sewing machine.
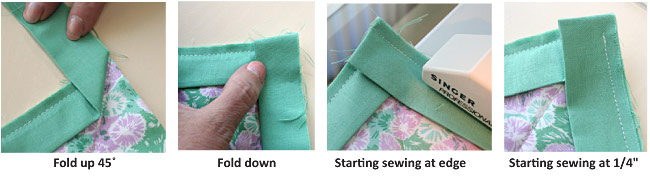
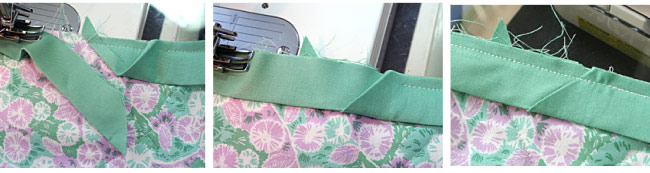
- Rotate the quilt one-quarter turn and gently fold the binding straight upward forming a 45 degree fold.
- Holding the 45 degree fold with your thumb, fold the binding back down with the binding's raw edges aligned with the edge (trimmed or marked) of the next side of the quilt.
- Start sewing again at the edge (as shown) or down 1/4" (or other size of seam allowance).
- Sew to the next corner until it is time to stop again.
- Repeat for all four corners.
How do I join the ends of the binding?
The binding ends can be joined using either the "tucked" or "seamed" method.
The "Tucked" Method
- Stop sewing about 3" from the start.
- Trim off the end of the folded binding at a 45 degree angle as shown, leaving enough to tuck into the start.
- Tuck the end into the start, making sure it lies smoothly.
- Finish sewing the binding to the quilt, overlapping your starting stitches.
The "Seamed" Method
- Continue around each of the corners until you reach the side where you started; stop about 8" to 10" from the previous stitching and backstitch (leave a 6" to 8" tail).
- Lay one tail down along the quilt's edge; cut it off perpendicular to the edge midway across the open space.
- Lay the second tail over the first; overlap an amount equal to the width of the binding strip and trim. For example, if 2-1/4" binding was used, overlap the tails 2-1/4". This can be measure by using a ruler or a piece of binding cut off and unfolded.
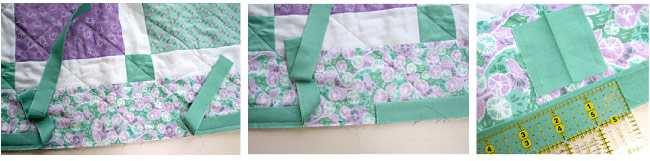
- The Fons & Porter Binding Tool has clear instructions for using the tool to join ends with a diagonal seam. These photos show the tool being used to overlap and trim the ends.
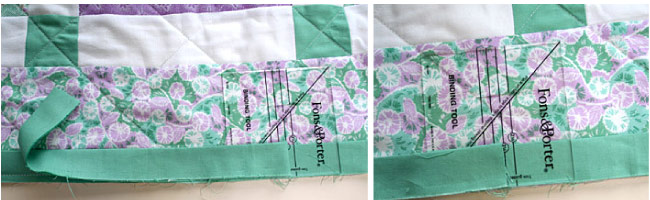
You're almost finished! The ends have already been trimmed to the length needed. All you have to do is figure out how to mark and sew the diagonal seam. The last steps can be tricky; they keep some quilters from using this method. Once you figure it out, it works great! Instructions are given with and without the Fons & Porter Binding Tool.
- Pay close attention to the way the ends of the binding are placed in the first photo. The binding is unfolded, the ends placed on top of each other with right sides together, at a right angle to each other and with edges matching. This should look familiar because it is similar to the technique used to piece strips together for binding (see Part Two). Note that the binding end on the right appears to be awkwardly twisted, which can be counter-intuitive.
- Draw a diagonal line and pin; the Fons & Porter Binding Tool is helpful but not necessary.
- Until you are confident about the direction of the diagonal line and placement of the strips, pin two straight pins exactly on the line where the seam will be (not shown) and refold the binding to confirm that the binding will lay along the quilt edge to be sewn (as in the last photo). There is no need to pin again, just remove the pins as you sew on the line.
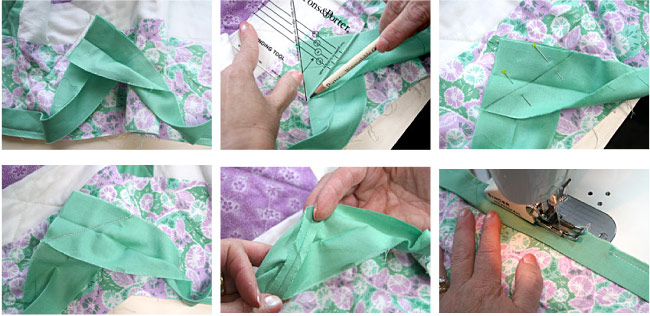
- Sew on the diagonal line of the unfolded ends; trim leaving a 1/4" seam allowance.
- Finger-press the seam open and refold the binding. Lay the binding along the edge and finish sewing the binding to the quilt overlapping the stitches at the start.
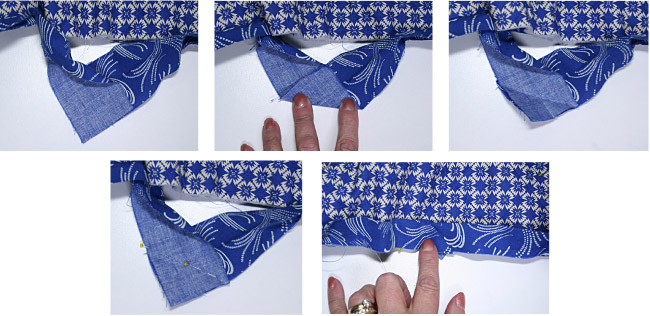
I've added a few more photos to show my personal version of the "seamed" technique. The twisting of the tails may be less confusing for me when done away from the quilt. Place the strip end on the right down first, with right side up; this will ensure that the diagonal seam is going the same direction as the other seams in the binding. Folding makes a crease marking the seam line without drawing it. Since I still like to check the seam line before sewing it, I pin two pins from left to right on the creased line, fold the binding and lay it down on the edge of the quilt. Yes, it's correct! I then unfold the binding and sew on the creased line pulling out the two pins as I sew. To finish, I follow the steps in the bottom row of photos above to trim the seam to 1/4", finger press seam open and finish sewing binding to the quilt.
Adding a Sleeve
If you wish to add a sleeve for hanging the quilt, sew the top edge of the sleeve while sewing the binding on the top edge of the quilt or after all the binding is sewn on by machine on the front. Make sure the sewing line is within the seam allowance of the binding. The bottom edge of the sleeve can be sewn by hand after the binding is folded to the back for hand-sewing.
End of Part Four - Part Five covers hand-sewing the binding to the back of the quilt.


