
Flying Geese - Specialty Rulers
by Karen Johnson
This tutorial features easy methods to construct the Flying Geese block, but with specialty rulers that take out the math for you!
We'll work with the Fons & Porter Flying Geese Ruler, the Mini Ruler Set by Eleanor Burns of Quilt in a Day, and the Flying Geese x 4 Ruler by Lazy Girl Designs. All three take out the math and let you jump right into cutting and piecing.
Let's start with Fons & Porter Flying Geese ruler. Watch a video version of this tutorial here. Yields flying geese units in finished sizes from 1" x 2" to 4" x 8".
Decide what finished size block you want and look at the ruler for the width you should cut your strip. We are making a 2 1/2" x 5" finished Flying Geese block. The ruler has black lines on the right side, for cutting the "goose" (red) and yellow lines on the left that we'll use later to cut the "sky". The ruler tells us to cut our strips 3" wide.
%20copy.jpg)
Lay the ruler on the strip, align the bottom line on the 3 and allow the black tip of the ruler to hang over the edge of the strip.
%20copy.jpg)
Cut as many "goose" pieces as you need. One "goose" piece will yield one Flying Geese block.
%20copy.jpg)
Here's a close up. See how the tip of the "goose' is cut off? This will come in handy when we piece this block together.
%20copy.jpg)
Now look at the other side of the ruler and refer to the yellow lines to determine the size strip to cut. It will also be 3" wide.
%20copy.jpg)
Because we need two mirror image triangles for the "sky", we layered our strips wrong sides together. Lay the ruler on the strip, align the yellow line marked 3 on the bottom edge of the strip. Allow the top yellow tip to hang off the strip. Cut through both layers.
%20copy.jpg)
This is what you have now. See how the tips are cut off? This will make it foolproof to know where to align your pieces when you sew them together.
%20copy.jpg)
See? If the tips were still there, you'd be unsure exactly where to align these two pieces. Stitch together using 1/4" seam allowance and press to the "sky".
%20copy.jpg)
Add the other "sky" piece, stitch 1/4" and press the seam allowance to the "sky" section.
%20copy.jpg)
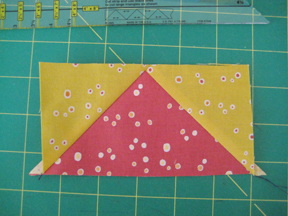
A Flying Geese block!
Now for the Mini Ruler Set by Eleanor Burns of Quilt in a Day. Watch a video version of this tutorial here. Yields Flying Geese blocks in these finished sizes: 2" x 4", 1" x 2", 1½" x 3" and ¾" x 1½".
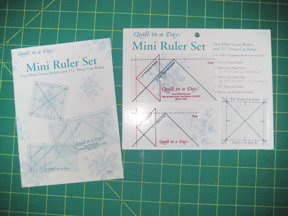
The rulers come with an excellent instruction pamphlet with step by step diagrams.
%20copy.jpg)
We chose to make the 2" x 4" finished block, so following the cut instructions, we cut a 7" square out of the "sky" fabric (yellow) and a 5 1/2" square out of the "goose" fabric (red). These two squares will make four total Flying Geese units!
%20copy.jpg)
Place the square right sides together (RST) and center the small square on the large square. Using a fine tipped marker, draw a line diagonally, from one corner to the opposite corner.
%20copy.jpg)
Now stitch through both layers, 1/4" from each side of the marked line. If you don't have a 1/4" foot, we suggest you draw these lines as well, then stitch on the lines. It will look like this:
%20copy.jpg)
Using a rotary cutter and ruler, cut on the center marked line.
%20copy.jpg)
You'll now have two pieces that look like this. Press each seam allowance to the larger piece (sky).
%20copy.jpg)
This part may feel a little strange. You will NOT be aligning the two seams! That's right, you will purposely keep the center seams apart. Instead align one corner/2 sides. We used the upper right corner in the picture, and made sure the horizontal top outer edge was aligned, and the vertical right edge was aligned. Notice the dog ears from the center seams do not line up!
%20copy.jpg)
Keeping the two blocks in that same position, pin if you need to, draw another fine line diagonally across the block, crossing the seam as shown. Again, stitch 1/4" on each side of this marked line. Then using a ruler and rotary cutter, cut on the marked line.
%20copy.jpg)
%20copy.jpg)
Using sharp tipped scissors, cut the seam allowance just to the edge of the seam, at the bulkiest section. Repeat on both pieces. This will allow you to press the seam allowance to the background (sky) color on each side.
%20copy.jpg)
%20copy.jpg)
All four sections of the seam are pressed towards the yellow (our background/sky).
%20copy.jpg)
Now for the fun part! Lay the Mini Cut Ruler on one side of the block, then place it directly over the "goose" portion of one side, as shown. Using a rotary cutter, trim all 4 sides around the ruler. Repeat on the other "goose".
%20copy.jpg)
%20copy.jpg)
This is what you'll have! Do the same on the other unit and you'll have four Flying Geese units that are perfectly proportioned and have exactly a 1/4" seam allowance for piecing to each other or another block.
%20copy.jpg)
And now Mari will demonstrate how to use the Flying Geese x 4 Ruler:


