
Kaleidoscope - Stack-n-Whack
by Karen JohnsonBethany S. Reynolds is the oh-so famous designer who first developed the beloved Stack-N-Whack® technique of layering fabrics before cutting to create Kaleidoscope blocks. Read an exclusive interview with Bethany, plus learn two different Stack-n-Whack® techniques from her books.
 First up, Bethany's Half-Square Triangle Block. The instructions here will yield two 15" finished blocks. How many blocks you can cut will depend on the size of your repeat. Bethany's books are full of layout ideas and complete fabric requirements.
First off, you'll need to prepare 8 layers and pin through all the layers. Watch this technique on our video from lesson one to learn how:
Now that you've got your focal fabric pinned, get ready to cut. We highly recommend you use a 60mm rotary cutter with a fresh blade to cut smoothly through 8 layers! Our repeat was approx 12 1/2" wide.
.jpg)
Watching carefully for pins, cut a 6 1/4" square. This square will make 2 blocks.
.jpg)
Cut the square in half on the diagonal. To be more precise, use the 45 degree marking on your ruler.
.jpg)
.jpg)
You now have 2 stacks. Each stack has 8 identical half square triangles. Pin each stack to stay organized. Set these aside for a moment.
.jpg)
Now you will cut the background fabric using the same exact dimensions as your focal block. In our case that's 6 1/4" square. Cut 2 squares, or 4 half square triangles to complete one block.
.jpg)
Next, cut 4 rectangles of background fabric (to complete one block), each 2 3/4" x 8 1/2".
.jpg)
Return to one of your stacks of focal fabric half square triangles. It will be very important to identify which side you will be sewing the background pieces to. Looking at the stack as a pyramid, as shown, with the long side down, place a pin in the left short side on each piece. This is the side you will sew all of the background pieces to.
To give you a visual of how these pieces are used, here are our sewn segments. This two sewn segments will form 1/4 of the block.
.jpg)
Stitch each background rectangle and each background triangle to the focal triangles. Press seams toward the focal.
.jpg)
.jpg)
.jpg)
These next two images are just all the pieces you've just sewn, laid out so you can see how all the components are placed. See the pretty kaleidoscope?!! You'll have a bit of overlap on each pair, where the background rectangle and the background triangle meet. Don't worry, you'll be trimming that in a moment.
.jpg)
.jpg)
Place one triangle/triangle unit RST (right sides together) on one triangle/rectangle unit. Trim away the extra rectangle piece, as shown. Then stitch on that same section. Press the seam open.
.jpg)
.jpg)
Your unit will now look like this from the back. Trim down the corner, as shown. This will help you match your seams more easily when joining the four units together.
.jpg)
.jpg)
Sew two segments together and press the seams open. Then carefully pinning at the center, stitch the two halves of the block together. Press the seams open.
.jpg)
.jpg)
Voila!
.jpg)
* * * * * * * * * * * * * * * * * * * * * * * * * * * * * * * * *
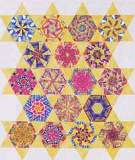 Now for the 60 degree Triangle block, using 6 triangles to form a hexagon. Shown here is just one layout idea from Bethany's book, Magic Stack-n-Whack® Quilts. This layout uses background triangles to set the hexagons without any Y seams, and to form a secondary shape of a star using a contrasting background fabric.
The instructions here will yield two 10 1/2" finished hexagons. How many blocks you can cut will depend on the size of your repeat.
Prepare 6 layers and pin through all the layers. Watch this technique on our video from lesson one:
Now all of your pins are in place along the top and bottom, however once you start cutting, those pins will no longer be effective. In our example, you will be cutting a 5" strip from the entire length of this piece, so place a few pins in the space that will become that 5" strip. Look where Karen is pointing to see where the pin is. Flat flower head pins will work well under the ruler.
.jpg)
.jpg)
Cut the strip.
.jpg)
We are going to cut 60 degree diamonds, then cut them in half. Make the first cut using the 60 degree mark on your ruler. The second photo shows a close up where the line is. This will vary on different ruler brands, but most have a 30 or 60 degree line.
.jpg)
.jpg)
Cut. Then place your ruler on your cut edge, which will automatically make the next cut a 60 degree angle, but double check yourself, look for the lines on the ruler (in our close up shot again).
.jpg)
.jpg)
.jpg)
Cut as many as you can from this strip. Again, how many you need for any specific project will vary, and how much you can get from your fabric depends on the size of your repeat.
.jpg)
Cut the diamond in half, as shown, and again, to double check yourself, look for the 60 degree (or 30 degree) markings on your ruler. In the photo on the right, Karen is pointing at both 60 degree markings to double check before she cuts.
.jpg)
.jpg)
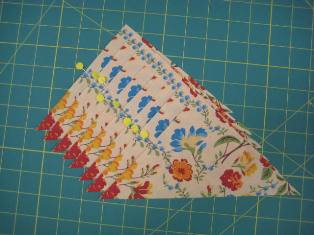
Cut. Each of these new triangle stacks, when sewn together, represent one hexagon block. Pin each stack to keep them organized.
.jpg)
.jpg)
Place a pin through each triangle, on the straight grain edge (the original edge of the strip you cut it from). This will be the outside edge of your block, and will ensure you don't turn any one of the triangles when piecing.
.jpg)
Keeping those straight edge pins to the outside edge, piece two pairs of triangles together. Press seams open.
.jpg)
.jpg)
Piece the third triangle to each pair, to form a half hexagon. Press seams open.
.jpg)
Place these two halves together and carefully pin the center, placing a pin through the 1/4" seam point before stitching. This will ensure nicely matched center points.
.jpg)
.jpg)
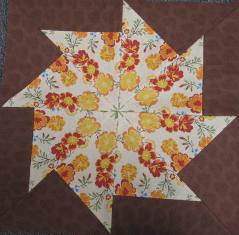
Here's your Stack-n-Whack® block! It's so much fun to unveil each completed block - each will look completely different!
.jpg)
To lay these hexagons out in the design shown from Bethany's book, above, we'll add star points to just two sides of the hexagon.
From your background fabric, cut exactly the same size triangle units as you did from the focal's. You'll need two triangle units for each hexagon.
.jpg)
Stitch on any one side of the hexagon block. Press the seam toward the background triangle. Repeat on the opposite side of the hexagon.
.jpg)
.jpg)
Now this unit can be sewn into rows easily, with no Y seams!
.jpg)
We hope you've enjoyed Kaleidoscope month! Don't miss Karen's exclusive interview with Bethany S. Reynolds The fabric used for this tutorial is from the Golden Afternoon collectio


